Over the last few years I have assembled what could quite rightfully be called an over-the-top travel coffee kit. I use this when I am staying at a hotel to make my morning brew. The kit has grown and expanded over the years but has pretty solidly settled on its current configuration. I share it here in case you might have a bit of space in your bag and want to mimic it.
Motivation
Before I dive headfirst into the kit itself it probably makes sense to explain a bit about why I have a kit like this in the first place. The superficial reason (and the one I am rightfully teased for) is that I enjoy a very particular type of coffee, prepared in a very particular way. Maybe I’m a snob or I’ve just gotten used to something and am too much of a curmudgeon to change.
The real reason however is more subtle. I am a very reluctant traveller. I don’t like waking up in a hotel bed, thousands of miles from home. I find the whole experience of being away somewhat unsettling. What I have found, however, is that if I can match and mimic my home routines while I travel I feel much more grounded. Waking up in a strange bed but then going over to the sink and doing the same routine that I would do at home helps ease my travel discomfort. It might be a bit silly but bringing along this little part of home has had a dramatic impact on my enjoyment of travel.
The Kit

The kit I travel with is comprised of seven parts. While it may look pretty large when laid out, it is actually quite compact when packed carefully. The Aeropress fits snugly into the kettle, the grinder handle detaches and the cups stack neatly into each other. It easily fits into my overhead-sized suitcase for short trips or in my checked bag for longer ones. You could pick and choose many parts of the kit but this is what I’ve found works best for me.
The Scale & The Coffee
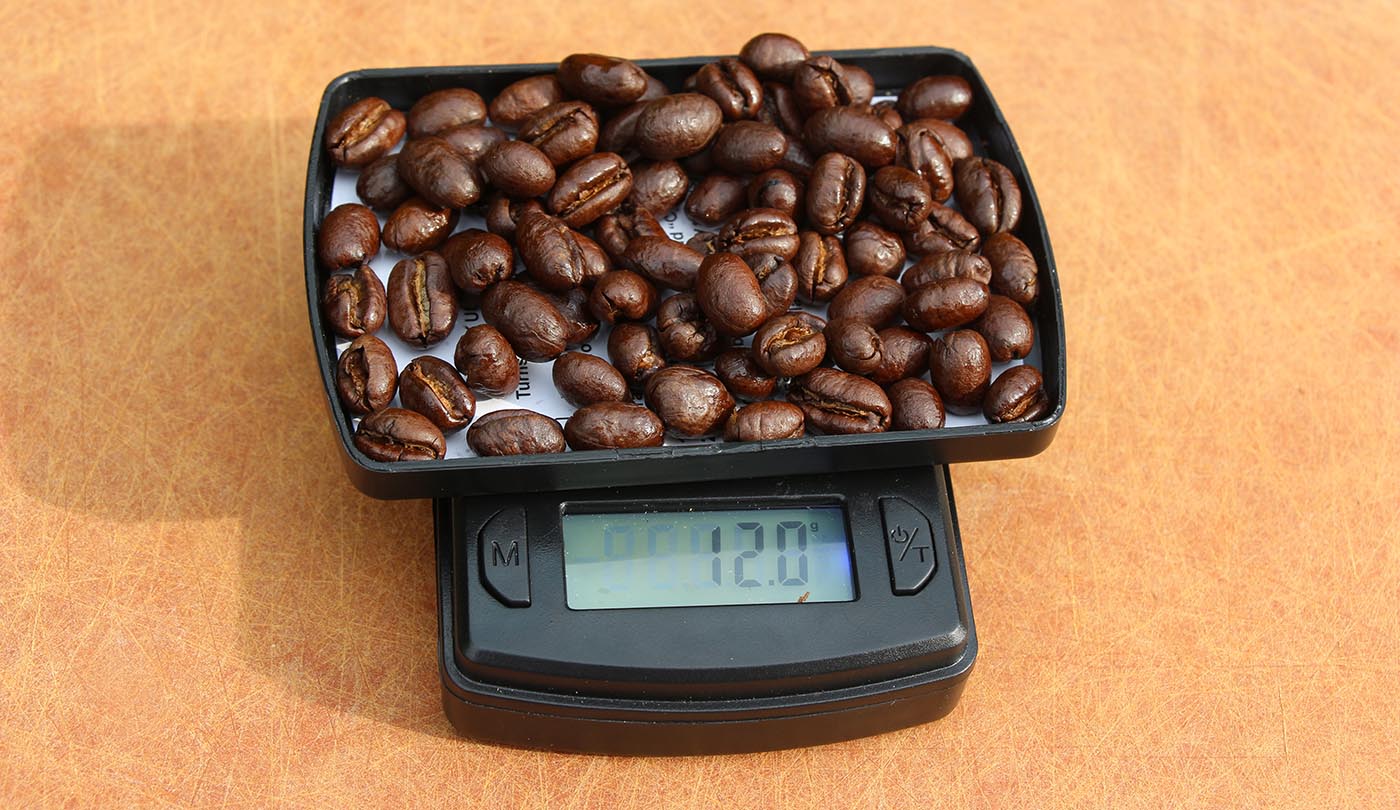
The most essential part of the kit is the coffee itself. Typically I will bring along a stash sufficient for the duration of my trip. Right now this is home roasted Tanzanian. I put this in a zip lock bag. I use a sealed bag rather than the typical vented coffee ones because I don’t want my clothes to smell of coffee. You can also pretty easily pick up coffee at your destination if you prefer.
I make my morning coffee using 12g of beans per serving. I used to just guess at how much coffee to use but have found more consistent results by weighing it out each time. This Pocket Scale ($7) does the job perfectly. It is extremely compact and battery powered. The cover also conveniently can be used as a little tray to hold the beans while being measured.
The Kettle

The next thing you need to make good coffee is clean, hot water. While every hotel room in the US has a coffee maker that in theory could be used to heat your water (run without its coffee/filter) the resulting water is putrid. I find that bringing along a small electric kettle is very worth its size. I find that a 1-liter kettle ($9) works well here. It is enough water for making a few cups if you are traveling with someone but still small enough to be reasonable to travel with.
One of the advantages of traveling to Europe is that this can be left at home. In my experience most european hotels will have a kettle rather than a coffee maker in their rooms.
The Grinder
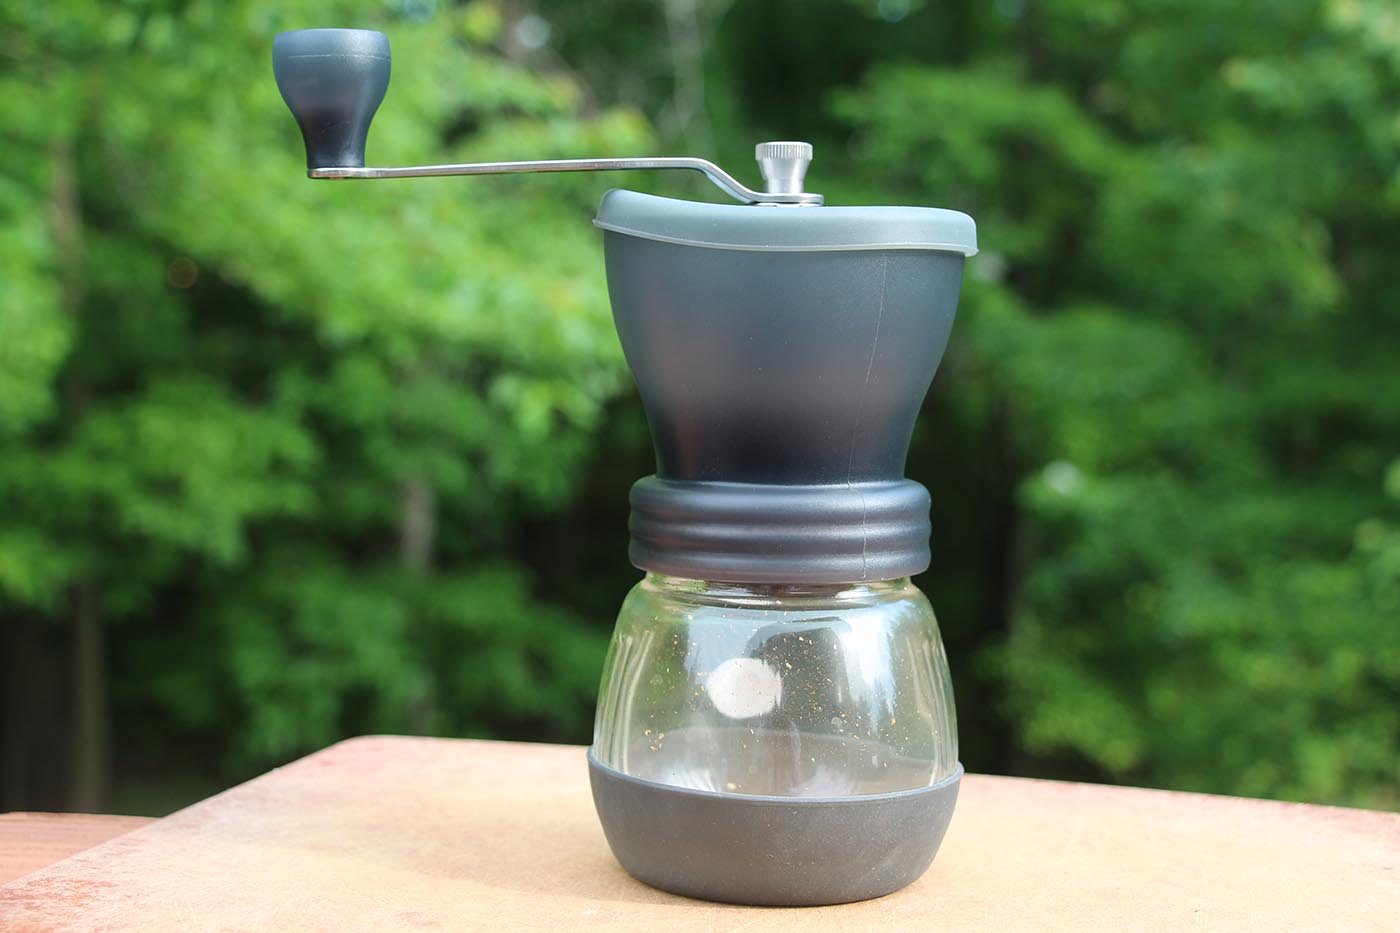
To grind up my coffee I use a small, hand cranked grinder ($37). The particular one I use (the Hario Skerton) is slightly bigger than it needs to be but I like the way it feels and the smoothness of its mechanism. It provides a very consistent grind and the effort required in the grinding isn’t too bad. Additionally it is also pretty quiet (as grinders go) so it won’t disturb the neighbors. If space is a concern Hario also makes a slightly smaller version, the Mini ($27), which I’ve also heard good things about.
The Aeropress
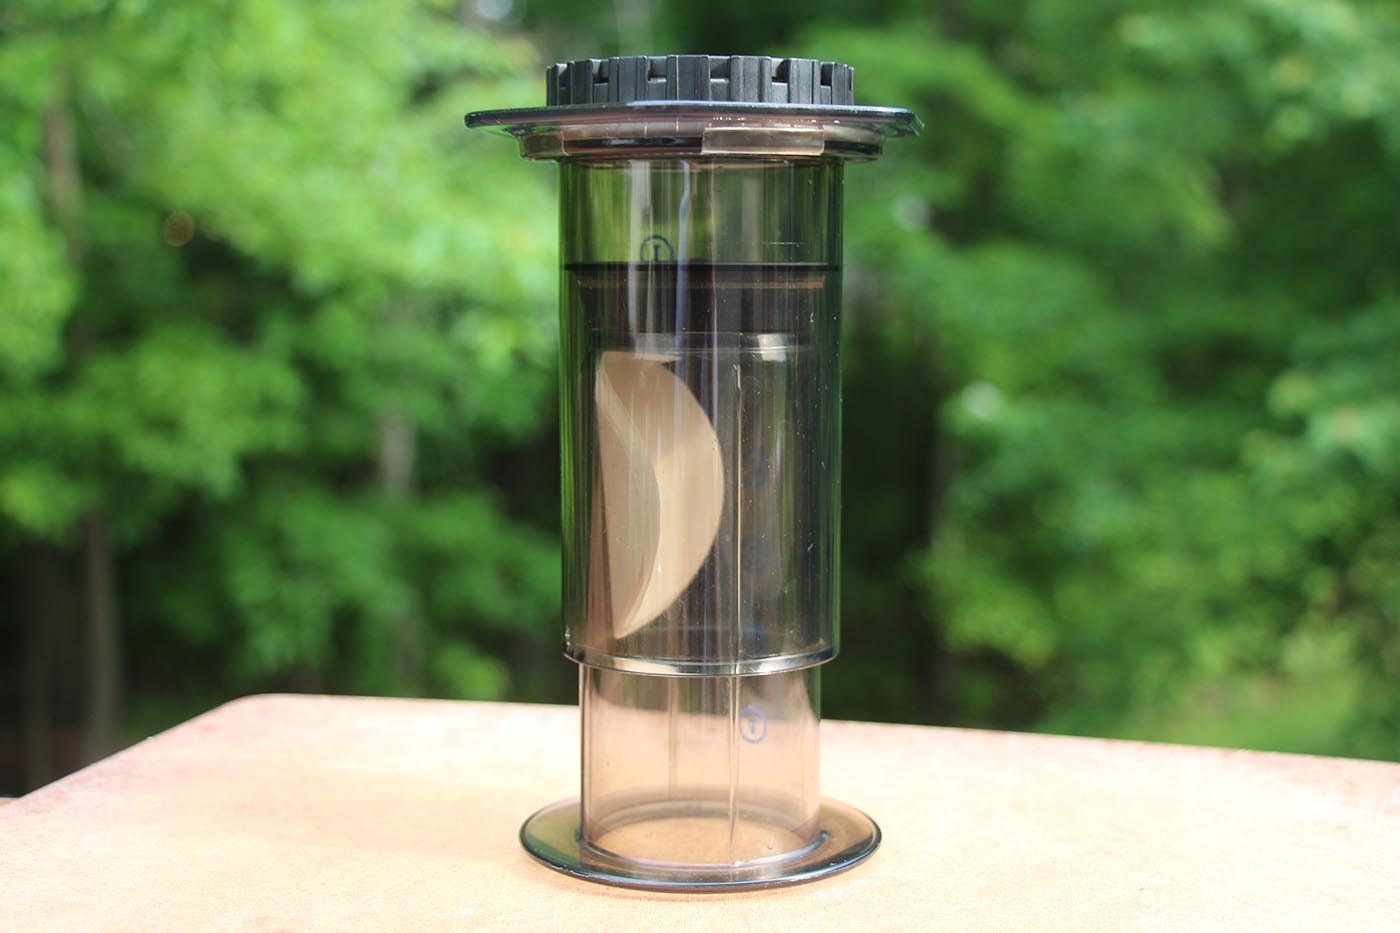
Of course the centerpiece of this whole setup is an Aeropress ($26). This is my preferred method of brewing coffee wherever I am. It lets you get really rich, flavorful cups with minimal mess or fuss. Also, since it doesn’t require electricity it is perfect for traveling. I brew using the Inverted Method which I find is more consistent than the directions you find on the box. The inner cavity of the plunger works perfectly as a filter holder. You can easily fit as many filters as you’d ever need for a trip.
The Cups
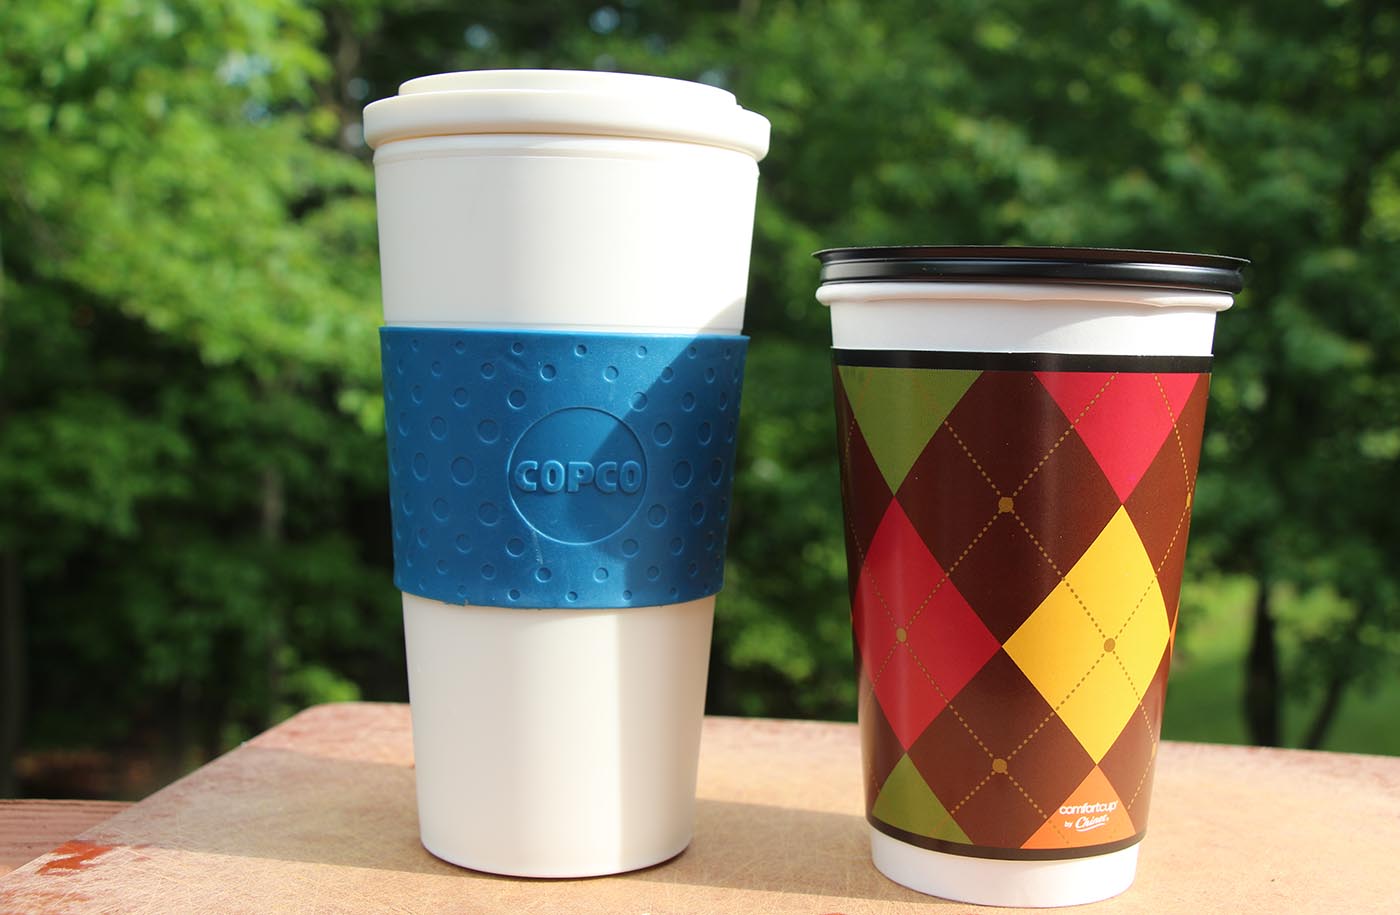
Lastly you’ll need somewhere to put the coffee. While most hotel rooms will have a foam or heat-safe paper cup for you to use the trouble is you likely can’t aeropress directly into these without crushing the cup. So I bring along a basic travel mug ($9). I will use this to press the coffee into and then depending on my schedule either enjoy it from that or transfer it into a disposable cup. I often bring along a few disposable cups just to make sure that I’ll have some with lids. Whenever I can I’ll use my reusable mug. However, when I’m going somewhere that carting it around after the coffee is finished will be annoying, I go disposable.
Conclusions
Bringing this along with me when I travel has greatly improved my sense of nervousness while away. I have found that especially when I’m traveling to conferences as a speaker it was an essential way to overcome my pre-speech jitters. Feeling like at least some small part of my day is familiar and under control is fantastic. The whole kit together cost me around $88, which for the resulting improvement in my travel comfort was a small price to pay.